JUGI-FASHIONS.COM
Silversmithing Techniques
Photo Journal of a Hammered Bangle
Below is a step by step proceedure I use to make a hammered texture bangle. A lot of silver jewellery that is hand made is made using wire, sheet and tube silver. As a silversmith I work with the silver in various ways to create the designs I want. For the hammered texture bangle I start with a strip of silver sheet.
 The strip is 1mm thick, 10mm wide and the length varies depending on the size of the bangle I wish to make. The length is always between 30 and 50mm shorter than the overall circumference of the finished bangle. Don`t forget that while hammering any kind of metal you are making the metal thinner but also longer.
 The strip of silver is still flexible enough for me to bend with my hands into a rough hoop shape. Its important that the ends to be soldered together are a good match. By using fine files I smooth the ends to an almost perfect joint that I then brush with a borax flux and finally place little pieces of solder called pallions onto the joint to be soldered.
 Now it is time to solder the join. For a bangle I use two blow torches. One is designed to heat the bangle and the other is to focus on the area around the join. The principle in soldering silver is to try and heat the whole bangle evenly. Both ends of the silver strip have to reach the solder melting temperature at the same time otherwise the solder will flow onto only one end of the silver rather than between both ends which creates the strong joint necessary for everyday wear and tear.
 You will see in this photograph that the silver has gone black. The reason for this is the sterling silver is only 92.5% silver and the other 7.5% is copper. It isn`t the silver that has gone black, but the copper has. The heat and oxygen makes the copper oxidise (like rust).
 Of course, using the blow torches on the bangle makes the metal extremely hot. The melting point of the solder I use is about 760 degrees centigrade. You can allow the metal to cool naturally in the air, but usually we want to quench the metal instead. Quenching means putting the hot bangle into cold water. One of the reasons we do this is it makes sterling silver harder by aligning the crystal structure inside the sterling silver compound.
 The quenching doesn`t change any other aspect of the silver. It is still the same colour as after heating and it is now ready to inspect the joint to see if it is good enough. If the are problems at this stage with the joint, they must be sorted out now as there is no way to do it later without damaging a finished bangle.
 Now we pickle the bangle. The pickle is designed to remove the copper on the surface of the bangle. Of course, no only does it remove copper, but also the copper oxidisation. That is the reason we do it.
 The pickle can take a while to work. By using a pickle with a temperature between 30 and 80 degress centigrade allows the pickle to work quicker. The higher the temperature the better but don`t go higher than 80 degrees centigrade for safety purposes. By this photograph the bangle has been in the pickle about 5 minutes.
 This silver has now been in the pickling solution for about 6 minutes and is ready to take out and rinse. Always rinse the pickle away as it is a type of acid and if given enough time could start disolving more than just your silver. Glass jars are perfect for keeping the pickle in as the pickle doesn`t affect glass in any way.
 The silver is now almost ghostly white. The reason for this is the copper on the surface is completely dissolved so pure silver is the only metal at the surface of the bangle.
 Now we scrub the surface with pumice powder. Usually after pickling there can be copper streaks visible on the surface of the silver. The pumice powder acts as an abrasive that sands the surface. We are not sanding very much of the surface just a few microns really. It is enough to make the remaining copper streaks disappear.
 Don`t forget to scrub inside and out. The cleaner the surface the better the results in the hammering stage. Before you ask, yes that is a toothbrush. It works great with the pumice powder....
 Time to start hammering the bangle. By using a cross pein hammer I can create an almost bark like finish. This is probably the longest part of the process. For this particular bangle I was hammering for at least 45 minutes. This isn`t because it takes that long to texture the whole bangle, but because during the hammering the bangle can start to become wavey in appearance, and also extra hammering also lengths the bangle. Hammering also makes the silver harder.
 I normally use a triblet when hammering a bangle as it is quite light to hold but is also a strong surface to hammer against. The hammer on its own wouldn`t create much of a texture but using a hard surface to hammer against you can really whack the metal hard put deep indentations on the surface.
 The bangle is now fully hammered all the way around.
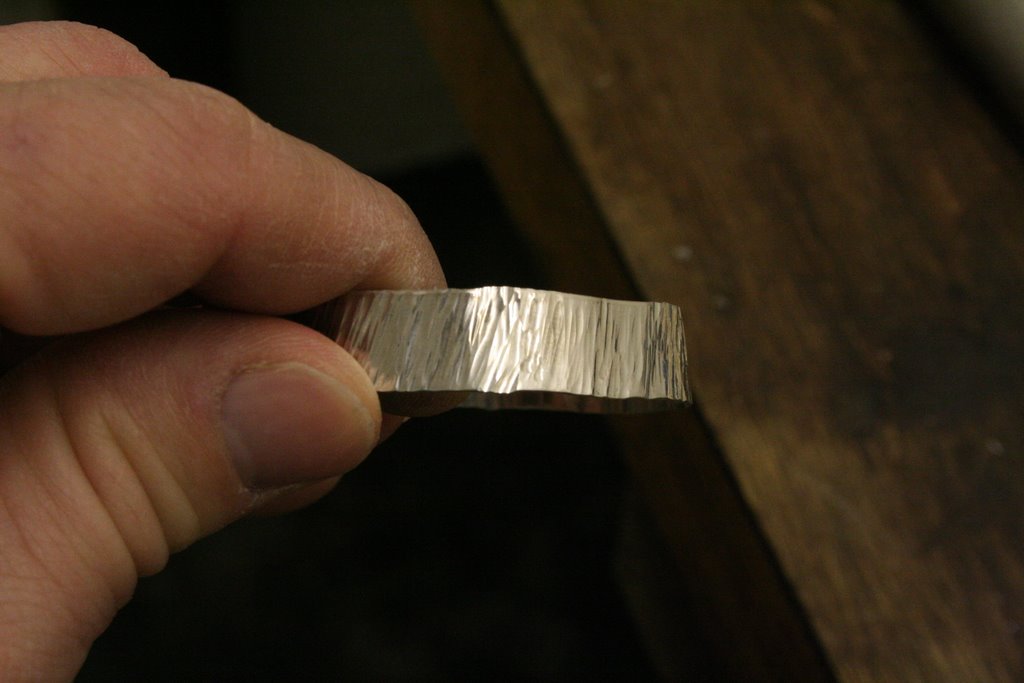 This is a better view of the texture available with a cross pein hammer. My hammers are not in the same condition that I bought them in, oh no. I have had to grind, file, sand and generally make every piece of equipment that I own better than the original. My cross pein hammer has a mirror finish for striking the silver. It leaves only a smooth indentation rather than a rather dull indentation at the time I bought the hammer. I have even had to improve my ring triblets, bangle mandrels and pliers. You need to be an engineer before you even think about making anything like silver, thankfully I am.
 There is just one more picture to show. This is how my finished bangle looks after I have raised the edges again through hammering. A quality piece of work and only one more thing to do. The bangle is now ready to go to the assay office for testing of silver purity. They stamp my work with their assay office stamp (in this case a rose for Sheffield), my makers mark which uses my initials JWS and the purity of the silver which should be 925.
I hope you have enjoyed this photo journal as much as I have enjoyed putting it together.
Jonathan Sayles